How do you fix cracked wall paint?
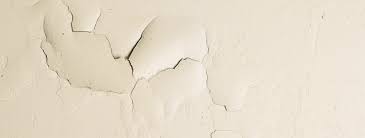
Flaking paint occurs when cracked paint begins peeling off its original substrate. In its early stages, the problem appears as hairline cracks in the paint, but will worsen over time if the problem is not fixed, causing larger pieces of coatings to chip off. Paint cracking on walls, ceilings, and exterior surfaces happens due to a variety of causes, one of the most common being poor preparation of a surface prior to painting. Painting over cracked paint is a bad idea; it is important to remove any flakes from the surface before repainting.
Why Does Paint Crack and Flake?
- Poor surface preparation, especially when the paint is applied to bare wood without priming, or to previously coated surfaces that show signs of cracking or flaking paint.
- Using low-quality paint, as it may have inadequate adhesion and/or flexibility.
- Spreading paint too thin during application.
- Paint becoming brittle with age, failing to expand and contract with temperature and humidity changes.
Note: A more uncommon version of paint cracking is mud cracking, which is when paint cracks when drying due to too-thick application or extremely dry painting conditions.
How to Fix Cracked or Flaking Paint
- If cracking does not go down to the substrate: Remove the loose or flaking paint with a scraper or wire brush, sand the area to feather the edges, prime any bare spots, and repaint the surface.
- If cracking goes down to the substrate: Remove as much of the existing paint as possible. Methods for removal could include scraping, sanding, using a heat gun, abrasive blasting, etc. Once most of the paint is removed and surface is smooth and even, prime, and repaint with a quality latex paint.
Why do cracks occur on walls?
Here are a few common reasons:
- Contraction and expansion: The materials (paint, plaster) that make up your wall contract and expand because of fluctuations in humidity levels and temperature changes. This is usually a problem if the wall is within a room that is periodically air-conditioned or it faces the afternoon sun quite a bit. The movement of contraction and expansion can cause hairline cracks to appear.
- Low quality paint: Inferior quality paint results in poor paint adhesion on your wall, which leads to cracks over time. In addition, using different paints for each paint coat can also cause cracks on the wall.
- There’s no way around it! Keep your paint consistent and use a high-quality product. It might hurt a little now, but it’s better than suffering for it down the road.
- Impatience during plasterwork: Sometimes, patience is the best way to go. Not letting cement plaster completely dry before applying paint is actually quite a common factor attributed to cracks. So put on some Netflix and chill out! It’ll be better than buying new paint to redo your walls.
- Poor paint job: Painting an entire house can be a huge amount of work, and it can be tempting to rush through it. But mistakes like missing out layers, or not letting previous layers completely dry can hamper your overall efforts. A good paint job takes time, so plan around it!
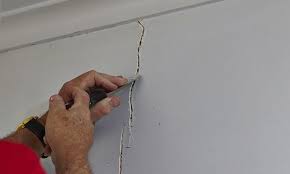
How to Remove Old, Cracked Paint
- The first will be to clean out all the old damaged paint and plaster that has come loose.
- The second step is to resurface the damaged area. I call this floating the wall or ceiling. This sometimes requires several applications of sheetrock compound which I will also refer to as MUD.
- The last step will be to sand to a finish and apply a couple of coats of primer/ sealer.
The final outcome will depend on the amount of care put into a relatively easy job. The problem comes with having the patience to take your time and do a good job of it. Read on for detailed descriptions of each of these steps.
Prevent the onset of paint cracking and flaking:
- Improperly prepped surfaces, like wood or brick, may harbor moisture that can make it hard for paint to adhere to walls. Avoid poor paint adhesion by properly cleaning and prepping walls, wood and brick surfaces before painting.
- Use the correct primer for the project. Alkyd primer is a high-adhesion paint-primer, popular with building professionals. This kind of priming-liquid can adhere to many different materials, including metal, masonry, and wood. It is also useful for priming pre-painted surfaces, and builders who plan to apply oil-based paints over latex sub coats should always consider using alkyd primers on the latex first.
- Do not dilute paint by adding too much thinner.
- Do not apply overly thin layers of paint to walls and other surfaces.
- If the weather conditions are too hot or too cold when paint is applied, this could lead to eventual cracking or flaking. Always apply paint when favorable weather conditions prevail.
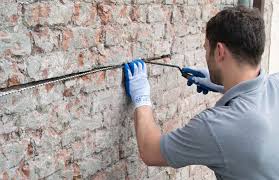
Repairing a Plaster Wall Crack
Press gently on the wall near the crack to see if it gives.
If it’s easy to press down or if the wall flexes at all, the plaster has likely come apart from the lath.This requires reattaching the two together and cannot be fixed by a simple patch job. Contact a professional for help.
Widen the crack using a putty knife if it’s less than 1⁄4 inch (6.4 mm) wide.
It sounds counterproductive but scoring (lightly scratching) the crack creates a wider surface for the joint compound to more easily adhere to.
Spread a coat of joint compound over the crack.
Do so with a 4 in (10 cm) taping knife. Use a setting-type compound instead of drywall compound as it is stronger and can affix to plaster more securely. Apply in thin layers. Dampening the crack before applying the compound will remove any loose particles and help the compound hold better.
Press fiberglass mesh tape firmly into the wet compound over the crack. Cut the strips to size with scissors. This self-adhesive tape will prevent the crack from growing. Let dry. For the setting-type compound to dry thoroughly, your room should be between 55 and 70 °F (13 and 21 °C).
Apply 3 layers of compound over the taped area.
Let each coat dry completely in between. With each additional layer, extend the compound another 2 to 3 inches (5.1 to 7.6 cm) outside the previous layer’s edges. Your last layer should extend 12 inches (30 cm) beyond the original area. Lightly sand each layer with a fine sandpaper to remove bumps in between coats. Use a feathering technique when applying the compound. With the knife at a 70-degree angle, start at the center and pull the knife to the outside edges of each coat, increasing pressure the further away from the middle you get.
Paint over the patched area to match the rest of the wall.
If you can see a raised section where you did your repair, sand it flush to the wall before painting so it blends seamlessly. It’s smart to wait at least 24 hours prior to painting to ensure the compound is completely dry.